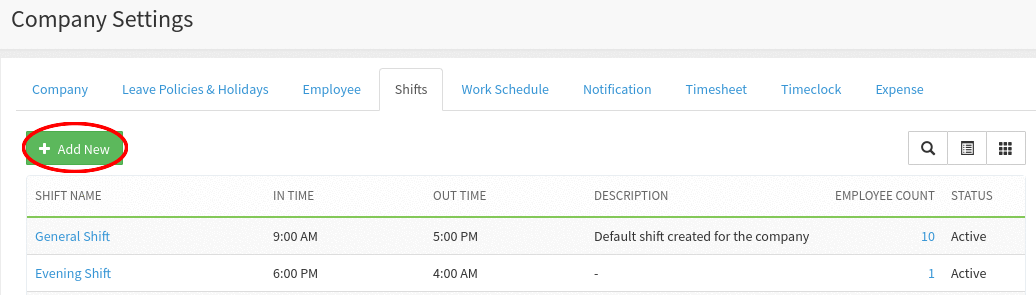
Shift Settings
Step 1:
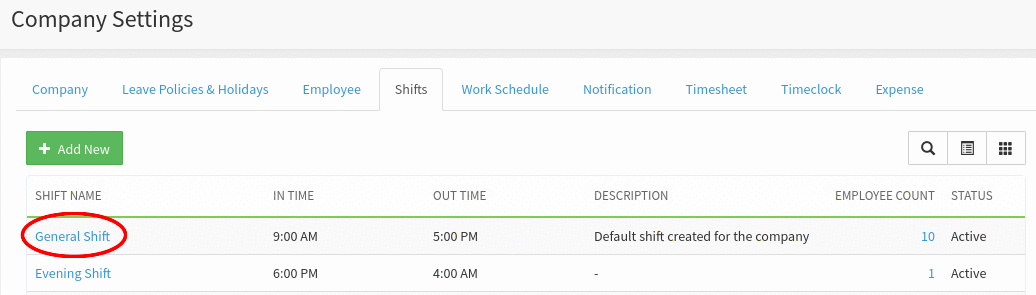
Go to Administration -> Company Settings -> Click on Shifts Tab

Step 2:
On clicking on the Shifts tab, the default General Shift will be displayed.
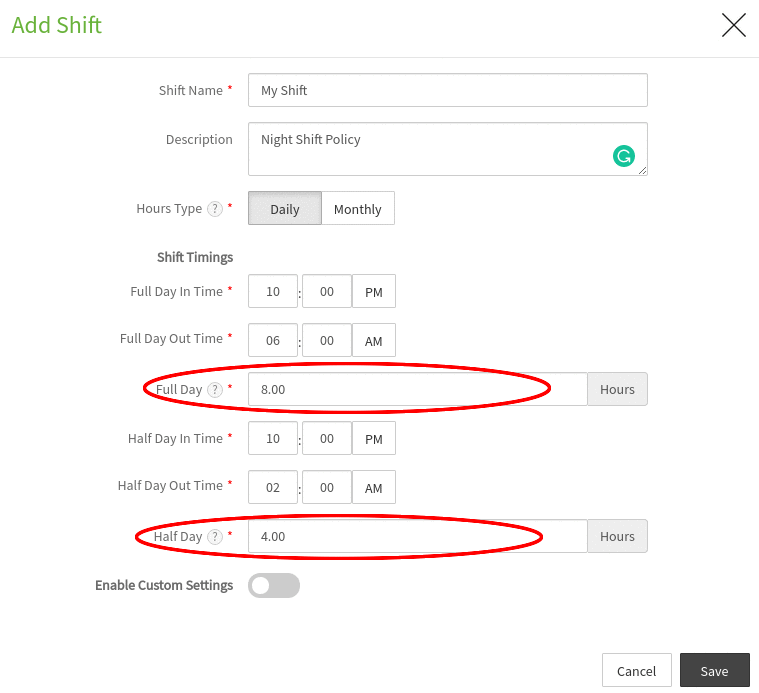
Add Shift:
Step 1:
To create new shift policy, click on the Add New button.
Step 2:
On click on Add New button a popup form to capture the details of the shift will be displayed. Enter all the required details and click on the Save button to create the shift policy.
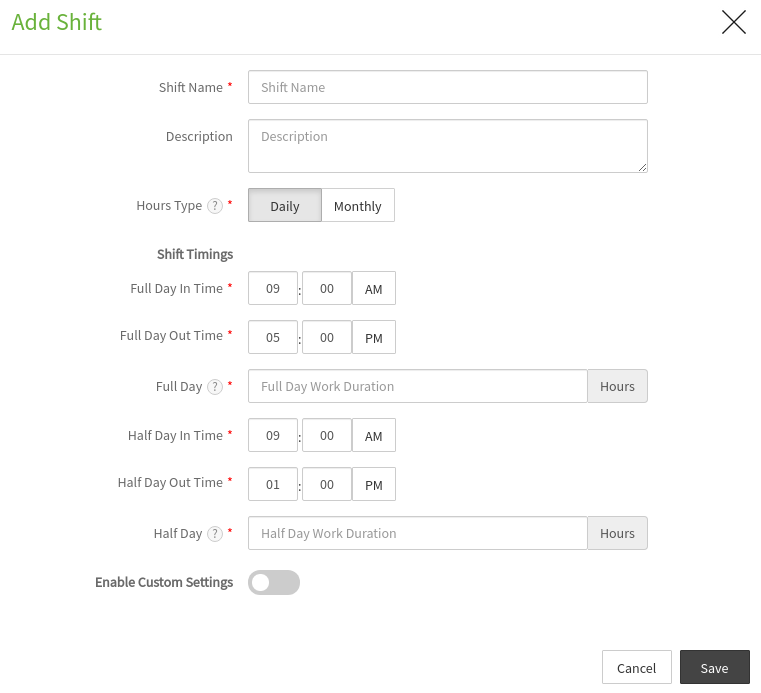
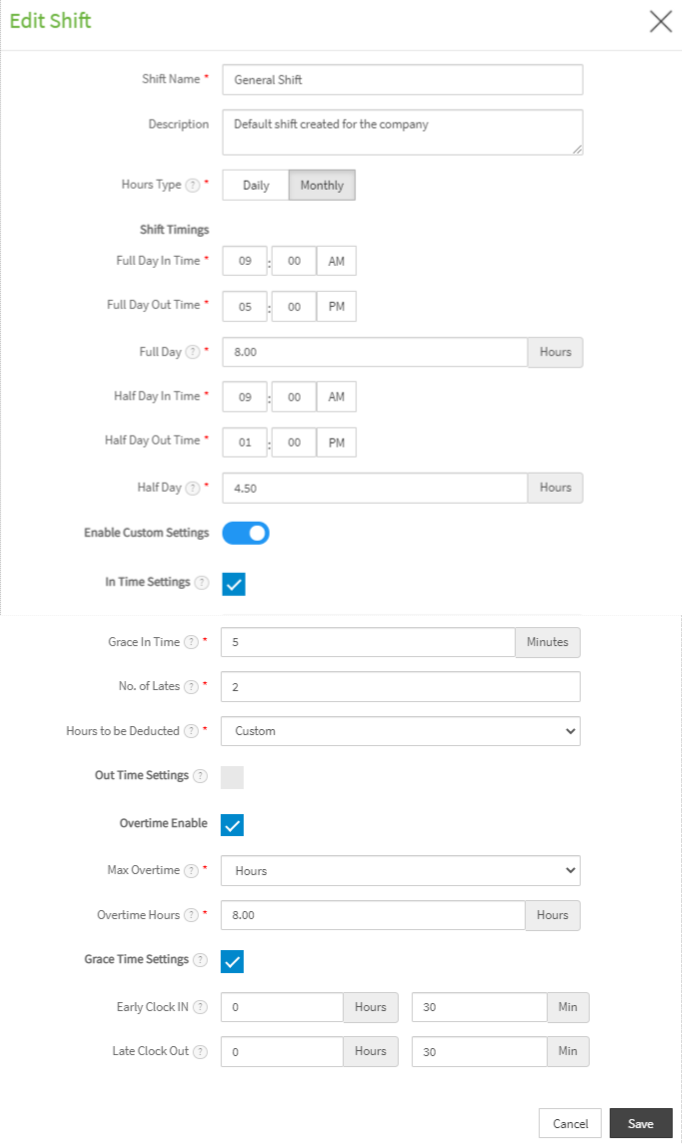
Custom Settings:
You can set customizable settings like work duration, grace period for In Time and Out Time settings when you enable custom settings.
Step 3:
Once you enable the custom settings the popup form will expand to capture further details.
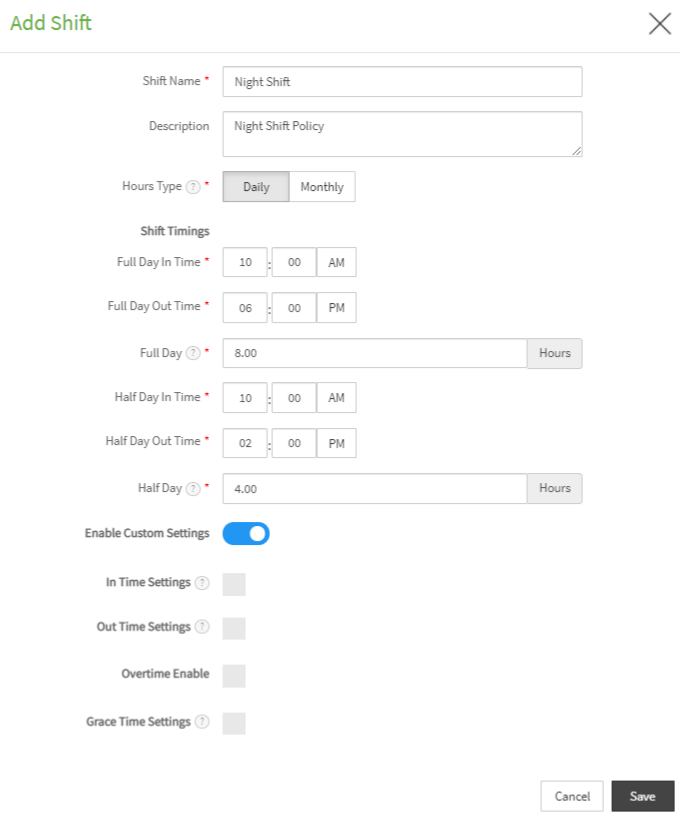
Step 4:
You can set work duration hours exclusively to the shift as full day hours and half day hours.
Step 5:
Enter the hours you want to set work hours for full day or half day.
Step 6:
You can set rules regarding shift timings like allowed grace period of In Time and Out Time and number of Hours to be deducted for late coming and early logout for the day.
Step 7:
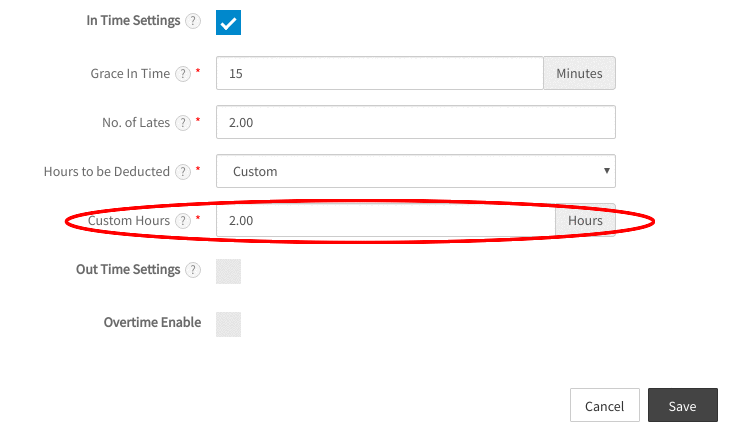
To set the shift In Time settings check the ‘In Time Settings’ box. On ticking the box ‘Grace In Time’, ‘No.of Lates’ and ‘Hours to be Deducted’ fields will be displayed in the popup.
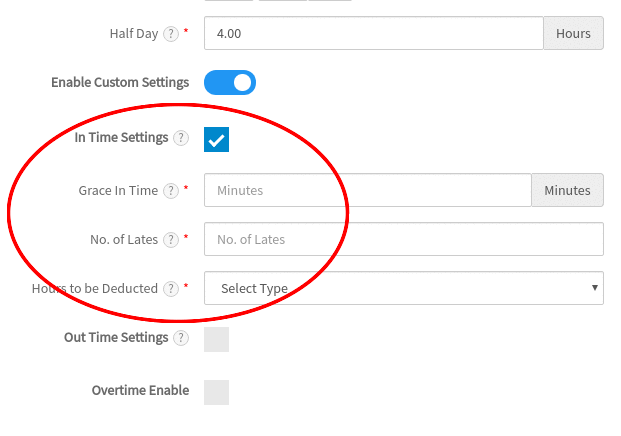
Grace In time: Is the time which is allowed after the specified Shift In Time.
No.of Lates: The permissible no.of lates that you can set to apply deduction rule.
Hours to be Deducted: Hours you want to deduct if the allowed number of lates exceeds.
Step 8:
Enter the minutes you want to set as a grace period for the Shift In Time. If an employee's punch in time crosses the ‘Grace In Time’ then it will counted as late for the employee.
Step 9:
Enter the no.of lates per month you want to allow for the employees.
Step 10:
Select the hours to be deducted from the drop-down. If ‘custom’ option is selected then Custom Hours text box will be displayed to the user to enter the custom hours to be deducted.
Step 11:
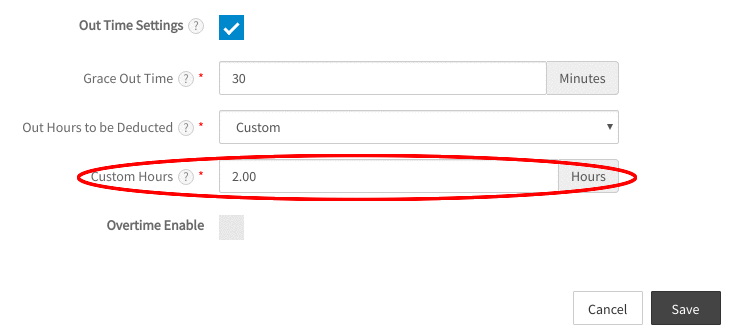
If you want to set the Out Time settings, check the ‘Out Time Settings’ box. On ticking the box ‘Grace Out Time’, ‘Out Hours to be Deducted’ fields will be displayed in the popup.
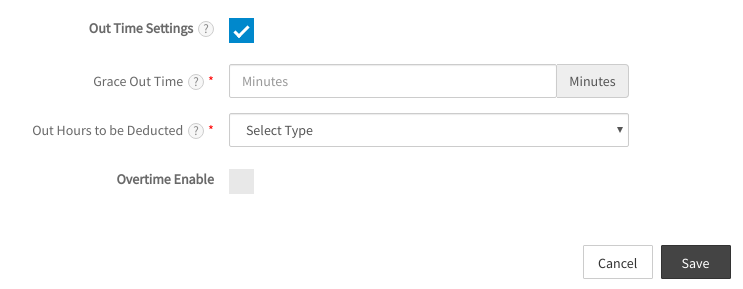
Grace Out time: Is the permissible time allowed for the employees to log out of the work for the day before the specified Shift Out Time.
Hours to be Deducted: Set the hours you want to deduct for the employee’s attendance if the employee leaves the work before the Grace Out Time.
Step 12:
Enter the minutes you want to set as a grace period for the Shift Out Time.
Step 13:
Select the hours to be deducted from the drop-down ,if employee’s punch out time is before the ‘Grace Out Time’.
Step 14:
If ‘Custom’ option is selected then Custom Hours text box will be displayed to the user to enter the custom hours to be deducted
{primary} Note: If option Full day or half day is selected from the drop-down, then the specified work duration hours would be deducted respectively as per the selection (Full day/Half day)
Overtime Settings:
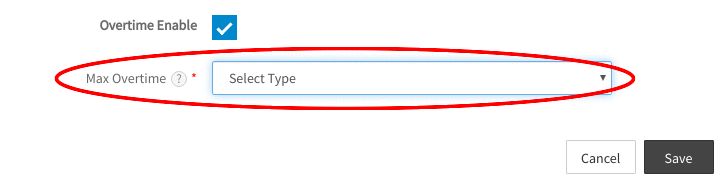
Under these settings you can set the restriction limit for the overtime hours or days allowed per month for the shift.
Step 1:
To set the Over time settings check the ‘Overtime Enable’ box. On tick of the box, ‘Max Overtime’ drop-down will be displayed on the screen.
Step 2:
You can choose either the days or hours you want to set the maximum limit for overtime per month:
- Choosing the option Days
- Choosing the option Hours
Choosing the option Days:
Step 3:
If you select the option ‘Days’ then another drop down ‘No. of days’ will be displayed in the popup with options “Total Days” or “Custom”.
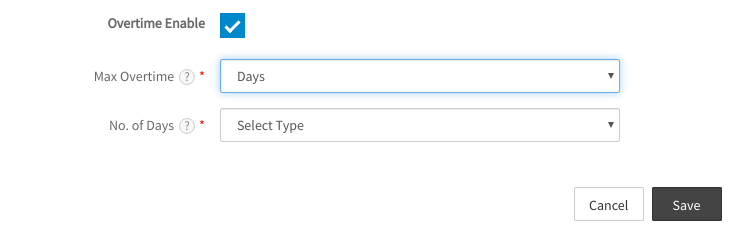
Total Days: If this option is selected then that total days that the employee have overtime in a month will be considered as Overtime days in the attendance report.
Custom: If this option is selected, then you can specify the max limit of days you want to set for considering the overtime days for employees.
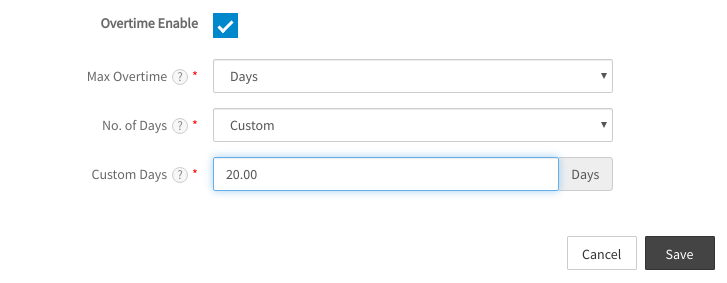
Step 4:
If you select “Custom” option a text box to capture the days count will be displayed in the popup. Enter the days count and click on “Save” button.
Step 5:
Enter the hours in the text box and click on “Save” button to save the settings.
Step 6:
On Click on the “Save” button, a success message will be displayed in the pop-up.
Step 7:
Click on the “Close” button to close the pop-up.
Step 8:
On closing the pop-up, you will be directed to the Shifts grid where you can see the newly added shift in the list with “Active” status.
Choosing the option Hours:
Step 3:
In the 2nd step of Overtime Settings, if you choose the option “Hours” then on selecting the Hours from the drop-down, a text box to capture the hours count you want to set as maximum limit for overtime hours per month will be displayed in the popup.
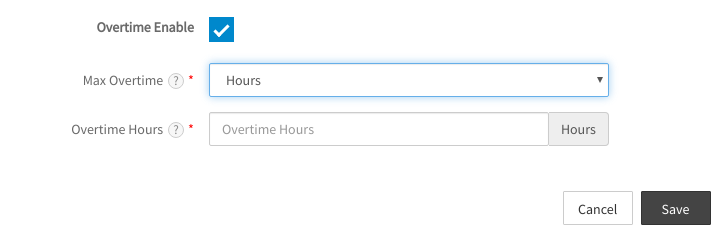
Step 4:
Enter the hours in the text box and click on “save” button to save the settings.
Step 5:
On Click on the “Save” button, a success message will be displayed in the pop-up.
Step 6:
Click on the “Close” button to close the pop-up.
Step 7:
On closing the pop-up, you will be directed to the Shifts grid where you can see the newly added shift in the list with “Active” status.
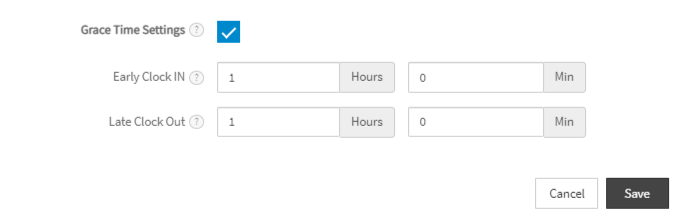
Grace Time Settings:
Under these settings you can set the early clock in hours and late clock out hours.
Step 1:
To set the Grace Time settings check the ‘Grace Time Settings’ box. On tick of the box, ‘Early Clock IN’ and ‘Late Clock Out’ text boxes will be displayed to enter hours and minutes for early clock in and late clock out hours.
{primary} Note: You can add up to 5 shifts only.
Update Shift:
Step 1:
To update shift, click on the shift name link shown in the Shifts grid.
Step 2:
On click on shift name link, Edit Shift popup with the shift details will be displayed. Update all the details you want to update and click on the Save button to update the shift policy.